When you're creating a website or app for business clients, adding Single Sign-On (SSO) support becomes really important. It makes things easier for users and meets enterprise security requirements.
This guide will show you how to set up SAML SSO using Okta as your identity provider, Go for the backend code, and WorkOS to handle the authentication process.
We'll cover two different ways to do this: using AuthKit (which gives you a ready-made login interface) or building your own custom login form.
Keep in mind that software tools change frequently, so if something doesn't match exactly what you see, check the official documentation for the latest updates:
User management quickstart (if you use AuthKit) or Single Sign-On quickstart
Prerequisites
Before we start, make sure you have:
Step 1: Install the SDK
First, add the WorkOS Go SDK to your project:
go get -u github.com/workos/workos-go/...
Step 2: Set secrets
To connect with WorkOS, you need your API key and client ID. You can find these in your WorkOS dashboard.
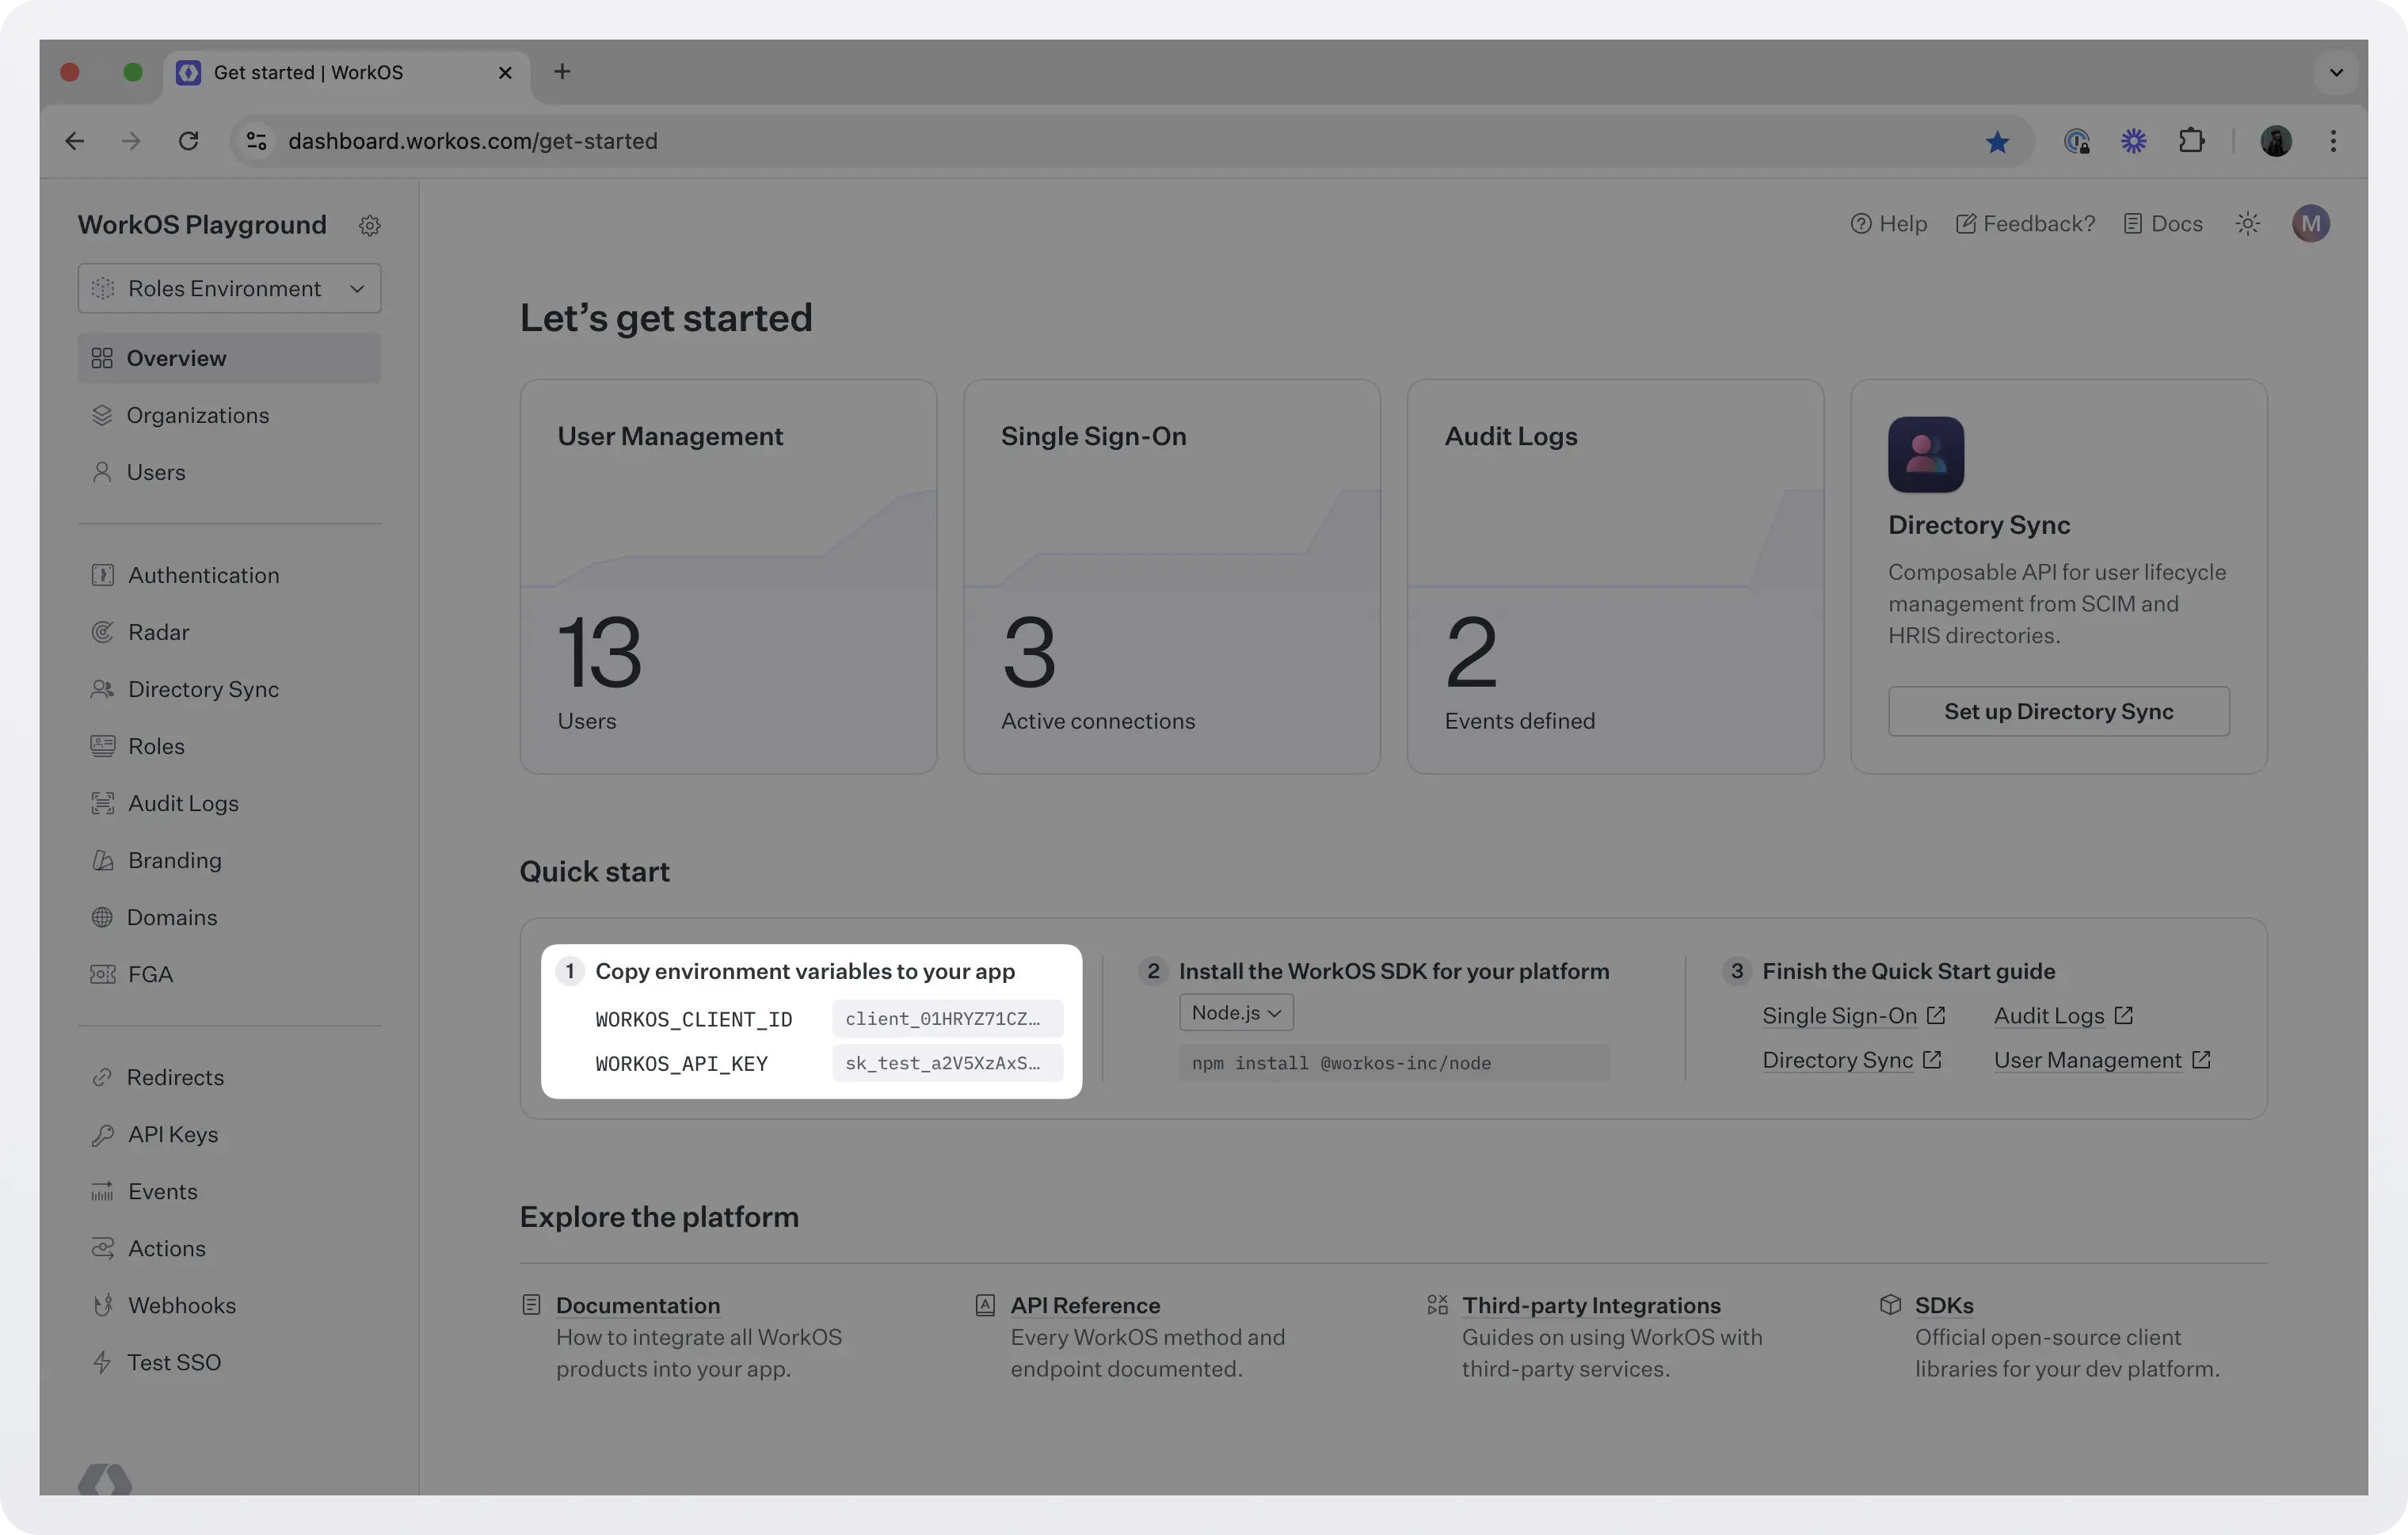
(Source: Workos)
Store these values securely and make them available to your app through environment variables:
WORKOS_API_KEY='sk_example_123456789'
WORKOS_CLIENT_ID='client_123456789'
Make sure to follow security best practices when handling these sensitive credentials.
Step 3: Configure the Okta connection
In WorkOS, SSO connections work at the organization level. An organization groups users together and controls which enterprise features they can use. When you enable SSO for an organization, all users in that group can use it.
This setup lets you do things like automatically requiring users with certain email domains to use specific SSO providers.
WorkOS configuration
Go to your WorkOS dashboard and click on Organizations in the sidebar
Choose an existing organization or create a new one for your Okta setup
Find the "Single Sign-On" section and click "Configure manually"
Select "Okta" from the dropdown and click "Create Connection"

(Source: Workos)
You'll need three pieces of information to set this up:
ACS URL: This is where Okta will send authentication responses after users log in
SP Entity ID: A unique identifier that tells Okta who is making the authentication request
IdP Metadata URL: Contains all the configuration details from your Okta setup
WorkOS provides the first two values automatically. You'll see them in the "Service Provider Details" section right after creating the connection.
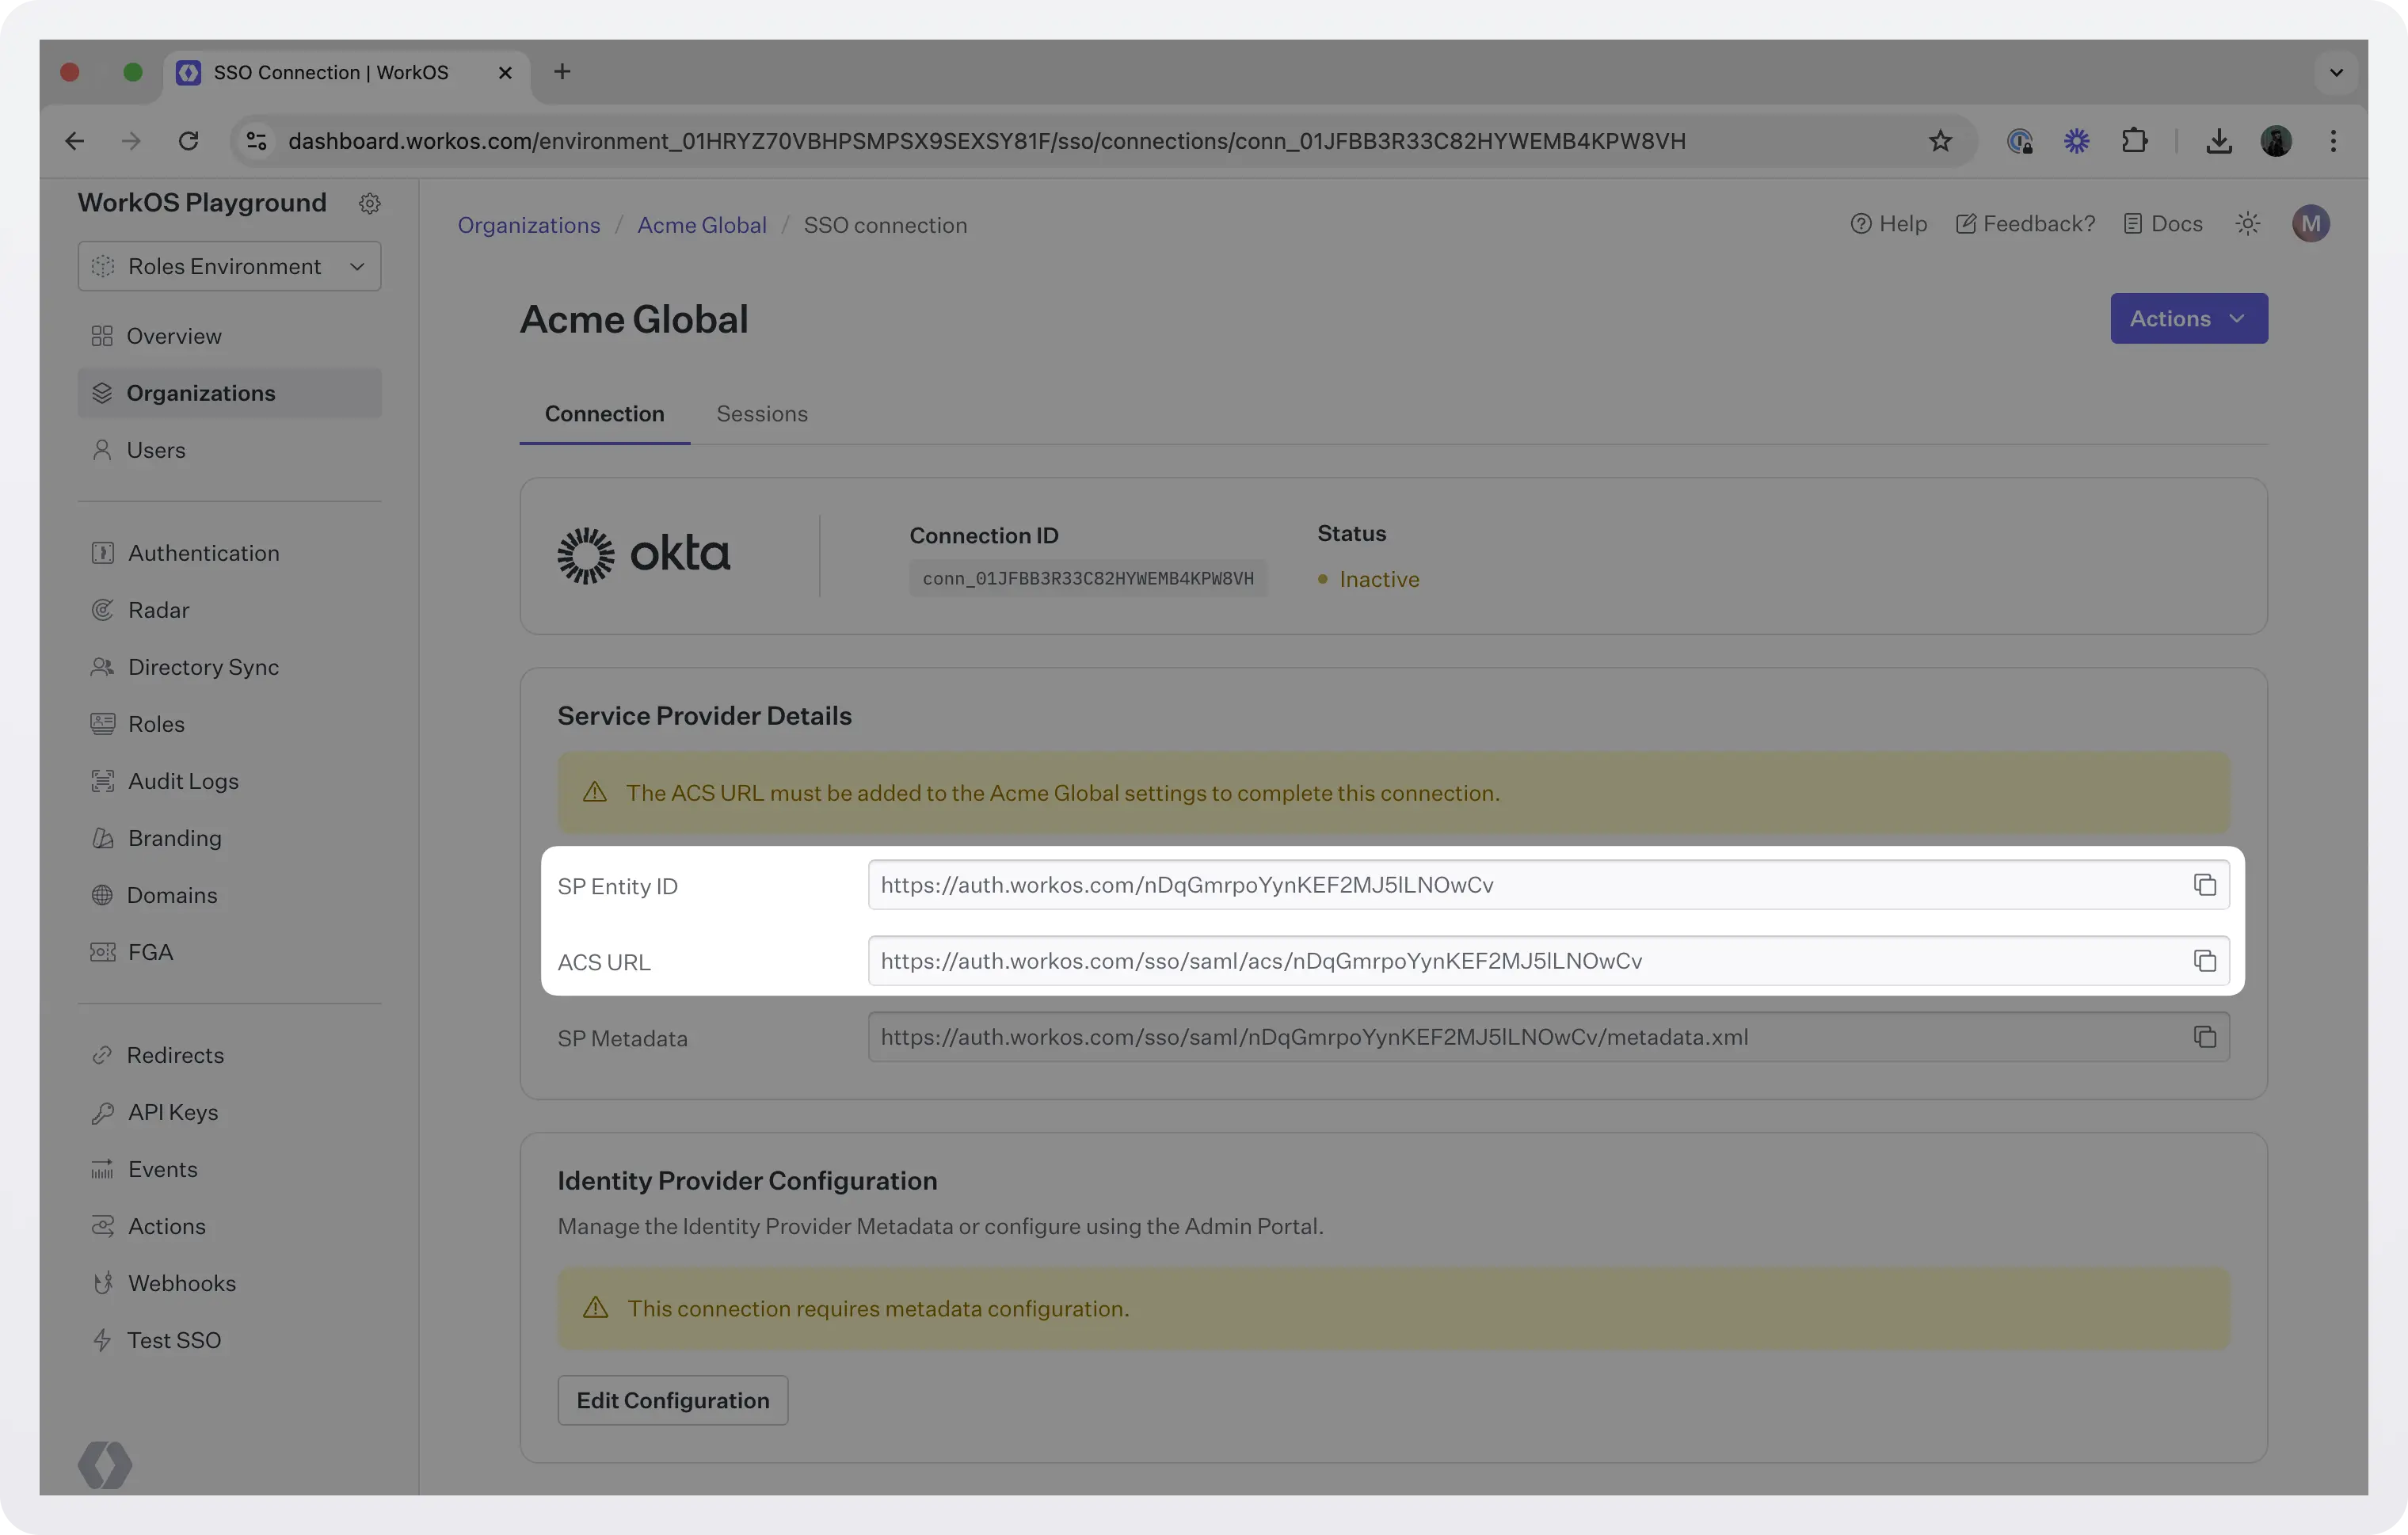
(Source: Workos)
Okta configuration
Now let's set things up on the Okta side:

(Source: Workos)
Log into your Okta admin dashboard
Go to "Applications" and either select your existing app or create a new one
Enter the ACS URL from WorkOS as the "Single Sign-On URL"
Enter the SP Entity ID as the "Audience URI (SP Entity ID)"
In the "Attribute Statements" section, add these mappings:
id → user.id
email → user.email
firstName → user.firstName
lastName → user.lastName
Assign users or groups to this application
Go to the "Sign On" tab, click "Actions" for your certificate, and select "View IdP Metadata"
Copy the URL from the new tab that opens
Back in WorkOS, click "Edit Configuration" in the "Identity Provider Configuration" section
Paste the Metadata URL and click "Save Metadata Configuration"
Your connection should now be active and ready to use.
Step 4: Configure a redirect URI
A redirect URI is where users go after they successfully sign in. We'll build this endpoint shortly, but first we need to register it in WorkOS.
Go to the Redirects section in your WorkOS dashboard and add your callback URL.

(Source: Workos)
Note that while you can use wildcards during development, production environments require exact URLs without wildcards or query parameters.
Step 5: Set up the frontend
Let's create a simple frontend interface. This example uses React, but you can use any framework you prefer.
If you don't have a React app yet, create one and add this code to your App.js:
export default function App() {
  return (
    <div className="App">
      <h1>SSO example</h1>
      <p>
        <a href="/login">Sign in</a>
      </p>
      <p>
        <a href="/logout">Sign out</a>
      </p>
    </div>
  );
}
Step 6: Set up the backend

(Source: Workos)
The authentication process happens in two main steps:
Start authentication: Redirect the user to their identity provider (Okta)
Complete authentication: Handle the response and get the user's information
You can choose between two approaches:
AuthKit: Use WorkOS's complete User Management API with built-in SSO support
Custom login: Build your own interface using the standalone SSO API
SSO with AuthKit
Initiate login
When someone clicks "Sign in", we need to start the authentication process. We'll use the usermanagement.GetAuthorizationURL method to create the URL where users will authenticate.
Add this code to your main.go:
package main

import (
    "context"
    "net/http"
    "os"

    "github.com/workos/workos-go/v2/pkg/usermanagement"
)

func main() {
    apiKey := os.Getenv("WORKOS_API_KEY")
    clientID := os.Getenv("WORKOS_CLIENT_ID")

    usermanagement.SetAPIKey(apiKey)

    redirectURI := "https://your-app.com/callback"
    provider := "authkit"

    http.HandleFunc("/login", func(w http.ResponseWriter, r *http.Request) {
        authorizationUrl, err := usermanagement.GetAuthorizationURL(
            context.Background(),
            usermanagement.GetAuthorizationURLOpts{
                ClientID:     clientID,
                Provider:     provider,
                RedirectURI:  redirectURI,
                State:        "dj1kUXc0dzlXZ1hjUQ==",
            },
        )

        if err != nil {
            // Handle error appropriately
            return
        }

        http.Redirect(w, r, authorizationUrl.String(), http.StatusSeeOther)
    })
}
After authentication, WorkOS redirects users back to your app with an authorization code in the URL, like this:
https://your-app.com/callback?code=g0FGFmNjVmOWIkTGf2PLk4FTYyFGU5
Handle the callback
Next, we need to exchange that authorization code for user information and access tokens.
Add this callback handler to main.go:
http.HandleFunc("/callback", func(w http.ResponseWriter, r *http.Request) {
    opts := usermanagement.AuthenticateWithCodeOpts{
        ClientID: clientID,
        Code:     r.URL.Query().Get("code"),
    }

    profileAndToken, err := usermanagement.AuthenticateWithCode(r.Context(), opts)
    if err != nil {
        // Handle the error properly
        return
    }

    userProfile := profileAndToken.User
    accessToken := profileAndToken.AccessToken

    // Use this information for your business logic

    http.Redirect(w, r, "/", http.StatusSeeOther)
})
The successful response includes detailed user information and tokens for session management:
{
  "user": {
    "object": "user",
    "id": "user_01E4ZCR3C56J083X43JQXF3JK5",
    "email": "user@example.com",
    "first_name": "John",
    "last_name": "Doe",
    "email_verified": true,
    "created_at": "2021-06-25T19:07:33.155Z",
    "updated_at": "2021-06-25T19:07:33.155Z"
  },
  "organization_id": "org_01H945H0YD4F97JN9MATX7BYAG",
  "access_token": "eyJhb.nNzb19vaWRjX2tleV8.lc5Uk4yWVk5In0",
  "refresh_token": "yAjhKk123NLIjdrBdGZPf8pLIDvK"
}
SSO without AuthKit
If you prefer to build your own login interface, use the standalone SSO API instead.
Initiate login
package main

import (
    "net/http"
    "os"

    "github.com/workos/workos-go/v3/pkg/sso"
)

func main() {
    apiKey := os.Getenv("WORKOS_API_KEY")
    clientID := os.Getenv("WORKOS_CLIENT_ID")

    sso.Configure(apiKey, clientID)

    orgID := "org_test_idp" // Use your actual organization ID
    redirectURI := "https://your-app.com/callback"

    http.HandleFunc("/login", func(w http.ResponseWriter, r *http.Request) {
        opts := sso.GetAuthorizationURLOpts{
            Organization: orgID,
            RedirectURI:  redirectURI,
        }

        authorizationUrl, err := sso.GetAuthorizationURL(opts)
        if err != nil {
            // Handle error
            return
        }

        http.Redirect(w, r, authorizationUrl.String(), http.StatusSeeOther)
    })
}
Handle the callback
http.HandleFunc("/callback", func(w http.ResponseWriter, r *http.Request) {
    opts := sso.GetProfileAndTokenOpts{
        Code: r.URL.Query().Get("code"),
    }

    profileAndToken, err := sso.GetProfileAndToken(context.Background(), opts)
    if err != nil {
        // Handle error
        return
    }

    profile := profileAndToken.Profile

    // Use profile information for your app logic

    http.Redirect(w, r, "/", http.StatusSeeOther)
})
This approach gives you a response focused on the authentication profile:
{
  "access_token": "01DMEK0J53CVMC32CK5SE0KZ8Q",
  "profile": {
    "object": "profile",
    "id": "prof_01DMC79VCBZ0NY2099737PSVF1",
    "connection_id": "conn_01E4ZCR3C56J083X43JQXF3JK5",
    "connection_type": "OktaSAML",
    "organization_id": "org_01EHWNCE74X7JSDV0X3SZ3KJNY",
    "email": "user@example.com",
    "first_name": "John",
    "last_name": "Doe"
  }
}
Step 7: Test the connection
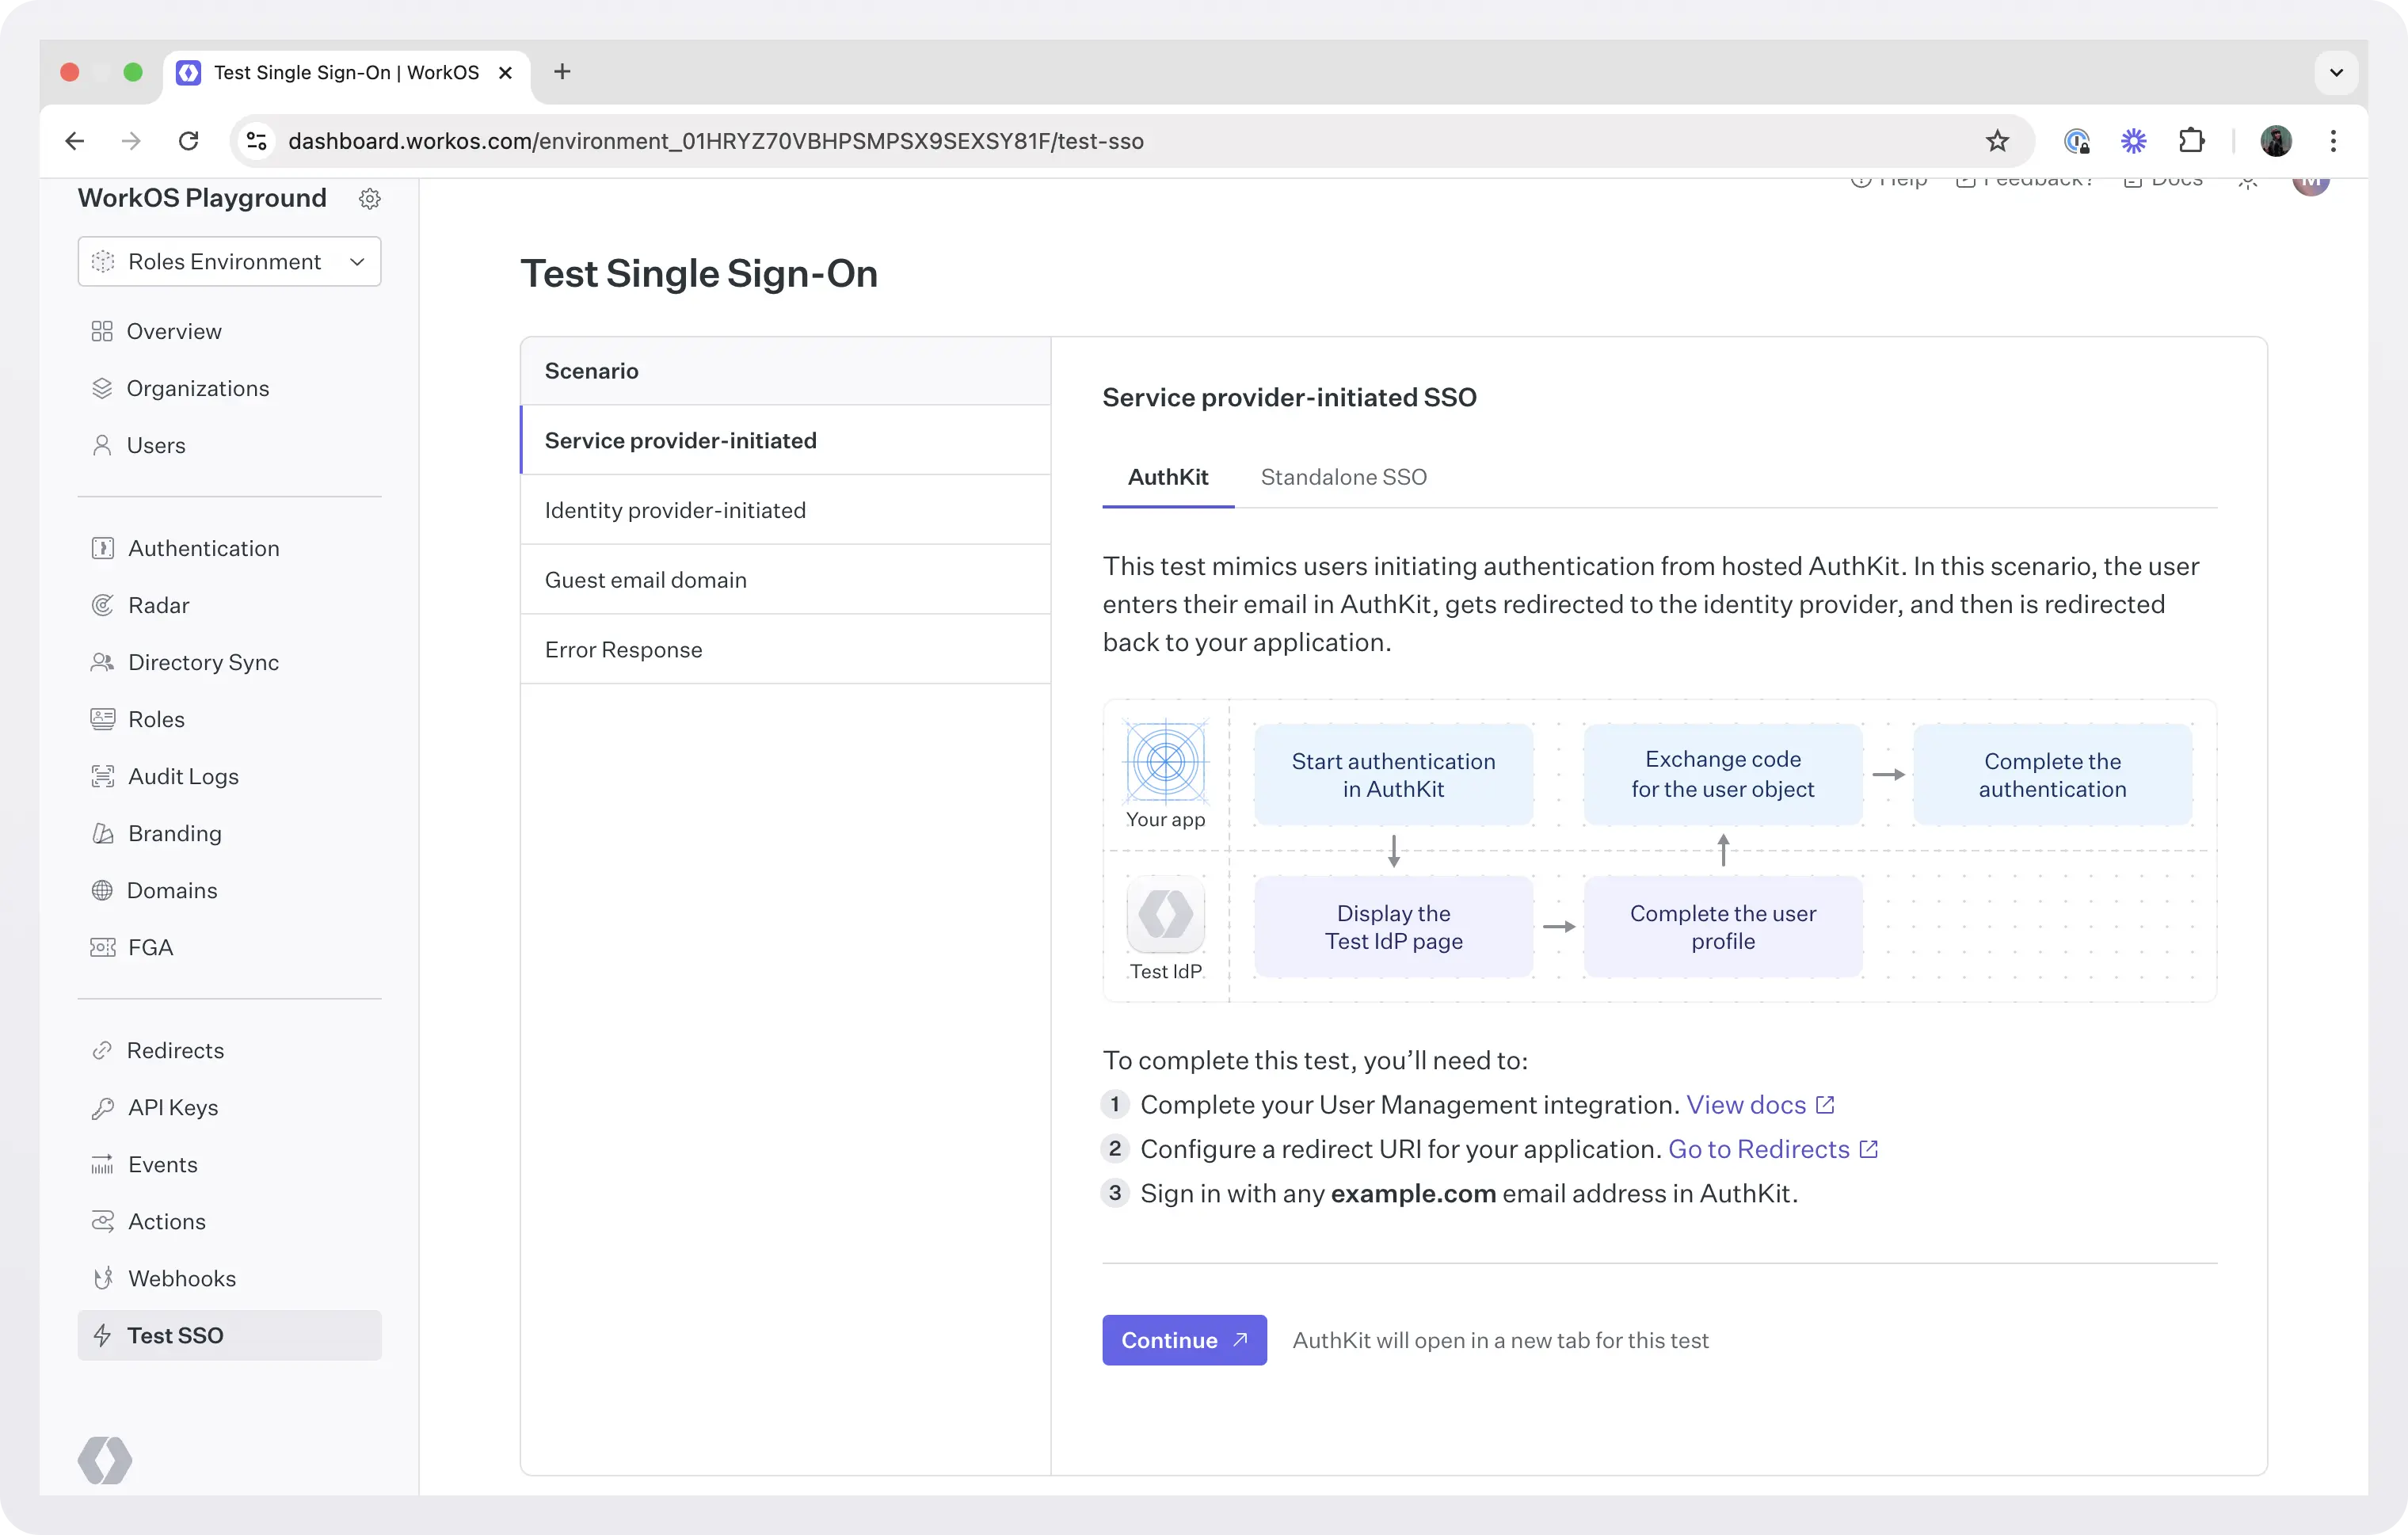
(Source: Workos)
WorkOS provides a handy testing environment to make sure everything works correctly. Go to the Test SSO page in your WorkOS dashboard.
You can test several scenarios:
Service provider-initiated SSO: Users start from your login page and get redirected to Okta
Identity provider-initiated SSO: Users start from Okta and get redirected to your app
Error handling: Test how your app handles authentication failures
Follow the on-screen instructions to run through these test cases and verify your integration works properly.
Next steps
Congratulations! You now have a working SAML SSO integration. But this is just the beginning. Here are some important features to consider adding next:
Secure session management and token handling
Logout functionality
Social login options (Google, GitHub, etc.)
Role-based access control
Automatic user provisioning
Error handling and logging
Multi-factor authentication support
Each of these features will make your authentication system more robust and user-friendly. Take them one step at a time based on your application's specific needs.

