Firebase is a popular web and mobile application development platform developed by Google that helps developers build, manage, and grow their apps easily. It offers various services for rapid app development and enhanced user experiences, including Firebase Realtime Database, Firebase Authentication, Firebase Cloud Messaging (FCM)/Firebase Push Notifications, Firebase Hosting, and Firebase Cloud Firestore. In this guide, we'll dive deep into Firebase Push Notifications and show you how to integrate them into your React app for both background and foreground notifications.
What is FCM/firebase push notifications?
Push Notifications are a powerful way to boost user engagement with your React application. Firebase Cloud Messaging (FCM) is Google's cloud-based messaging service that lets you send notifications to mobile devices and web applications.
Using FCM is like having a direct line to your users - you can notify them whenever there's something new worth checking out. It's essentially a gentle tap on their shoulder, reminding them to come back and explore your app, keeping them engaged and happy.
Benefits of FCM:
Cross-Platform Support
Real-Time Engagement
Scalability and Reliability
User Segmentation
Easy Integration with Firebase Services
Free Tier Availability
Customization Options
Security Measures
Sample react app setup
Initialize a Vite React project: Run the following command to create a new demo React app:
npm create vite@latest demo-app --template react
cd demo-app
npm install
Install dependencies: We'll install
firebaseandreact-toastify. Thereact-toastifypackage makes it super easy to add notifications to your app.
npm i firebase react-toastifyFolder structure:
.
├── index.html
├── package.json
├── package-lock.json
├── public
│   ├── firebase-messaging-sw.js
│   └── vite.svg
├── README.md
├── src
│   ├── App.css
│   ├── App.jsx
│   ├── assets
│   │   └── react.svg
│   ├── components
│   │   └── Message.jsx
│   ├── firebase
│   │   └── firebaseConfig.js
│   ├── index.css
│   └── main.jsx
└── vite.config.js
Firebase project setup
Initialize a new Firebase project: Add a new Firebase project and give it a name. You can enable or disable analytics based on what you need.

(Image Source: PushEngage)
Generate Firebase config: We need to connect our Firebase project with our React app. To do this, we need the Firebase config details. Go to
Project settings > General > Your apps. Then select the web app option.
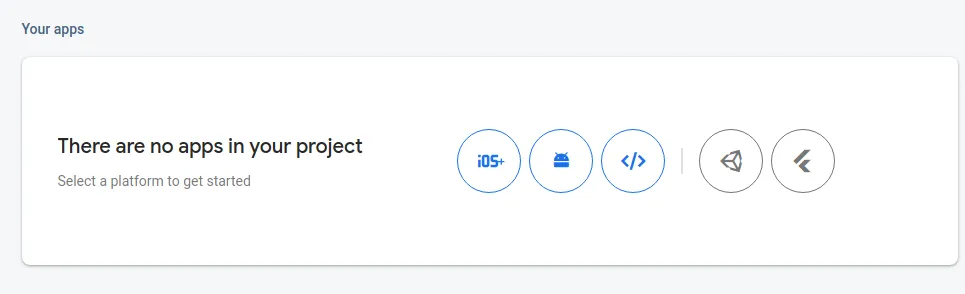
(Image Source: PushEngage)
Register your app, and Firebase will generate a configuration for you.
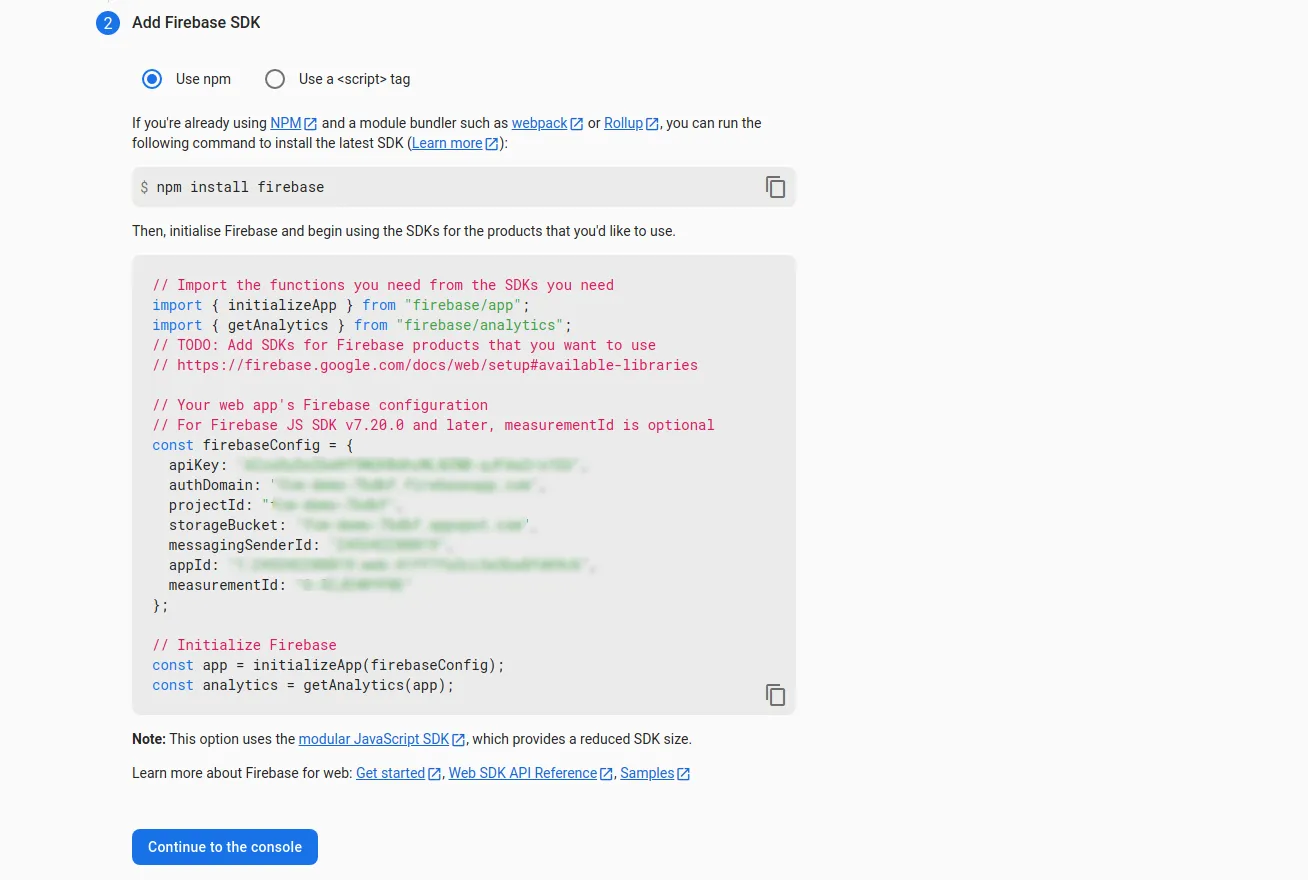
(Image Source: PushEngage)
Generate web push certificate key (VAPID key): VAPID stands for Voluntary Application Server Identity, which is a way to send and receive website Push Notifications. Your VAPID key allows your server to send web Push Notifications directly to browsers. Go to
Project settings > Cloud Messaging > Web configurationand generate a key pair.
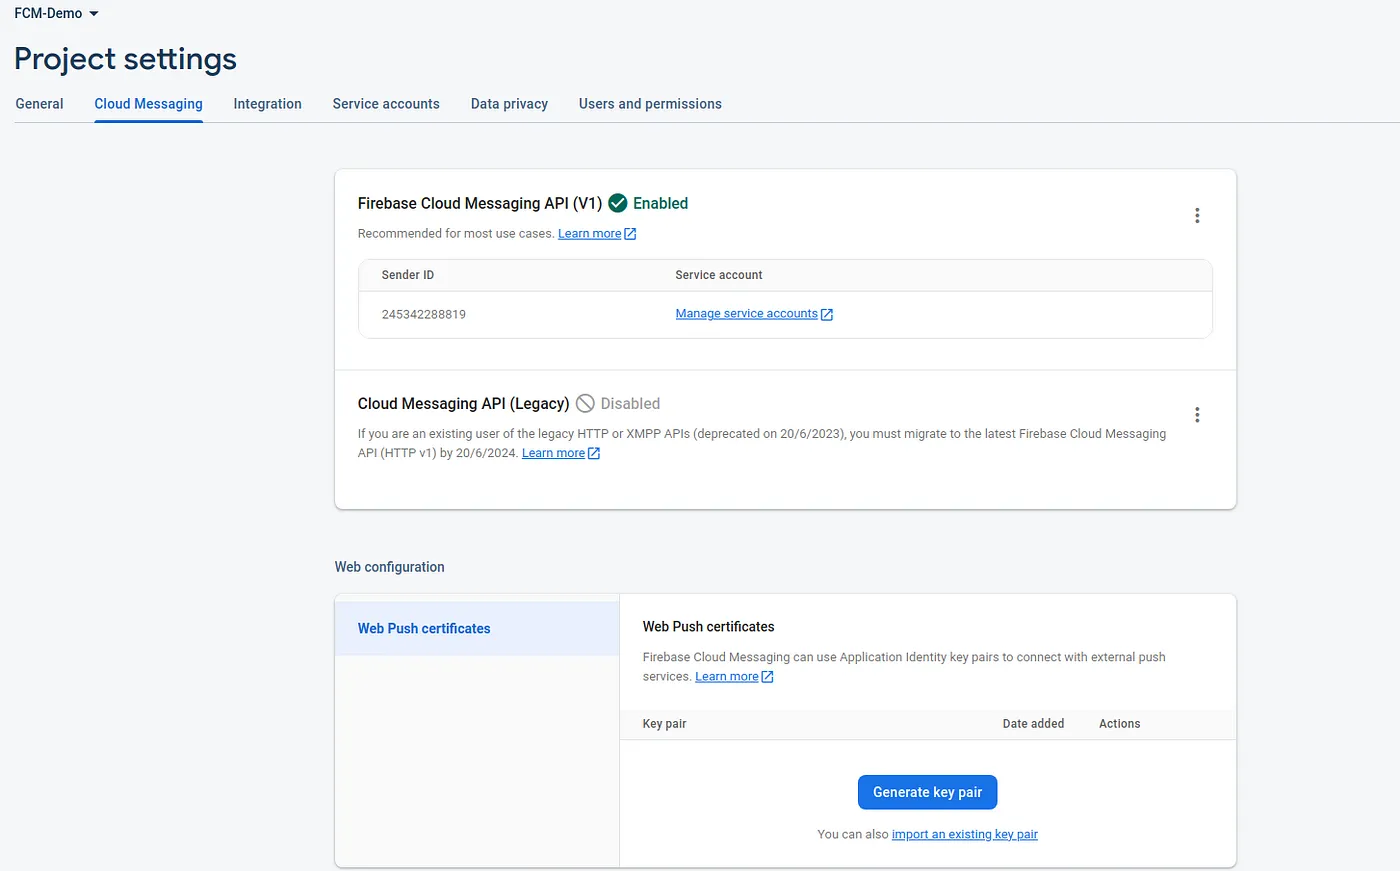
(Image Source: PushEngage)
Connect react application with firebase project
Create environment variables: Create a
.envfile in your project's root folder and store all the Firebase config values and VAPID key securely:
VITE_APP_API_KEY=your-api-key VITE_APP_AUTH_DOMAIN=your-auth-domain VITE_APP_PROJECT_ID=your-project-id VITE_APP_STORAGE_BUCKET=your-storage-bucket VITE_APP_MESSAGING_SENDER_ID=your-messaging-sender-id VITE_APP_APP_ID=your-app-id VITE_APP_MEASUREMENT_ID=your-measurement-id VITE_APP_VAPID_KEY=your-vapid-keyYou can access these values in your code using:
import.meta.env.<VITE_APP_VARIABLE_NAME>Create firebaseConfig.js: Create a config file at
src/firebase/firebaseConfig.js. Initialize the app and connect it to your Firebase project using the config details. To enable the messaging service, we'll usegetMessagingfromfirebase/messagingand connect the app with the messaging object.
import { initializeApp } from "firebase/app";

import { getMessaging } from "firebase/messaging";

//Firebase Config values imported from .env file
const firebaseConfig = {
  apiKey: import.meta.env.VITE_APP_API_KEY,
  authDomain: import.meta.env.VITE_APP_AUTH_DOMAIN,
  projectId: import.meta.env.VITE_APP_PROJECT_ID,
  storageBucket: import.meta.env.VITE_APP_STORAGE_BUCKET,
  messagingSenderId: import.meta.env.VITE_APP_MESSAGING_SENDER_ID,
  appId: import.meta.env.VITE_APP_APP_ID,
  measurementId: import.meta.env.VITE_APP_MEASUREMENT_ID,
};

// Initialize Firebase
const app = initializeApp(firebaseConfig);

// Messaging service
export const messaging = getMessaging(app);
Notification permissions and registration token
To send Push Notifications to a browser, we need the user's permission. We'll use the browser's Notification API to ask for permission, and then use Firebase's getToken method with our messaging object to get a registration token.
In your App.jsx, add this code:
import { getToken } from "firebase/messaging";
import { messaging } from "./firebase/firebaseConfig";

const { VITE_APP_VAPID_KEY } = import.meta.env;

  async function requestPermission() {
    //requesting permission using Notification API
    const permission = await Notification.requestPermission();

    if (permission === "granted") {
      const token = await getToken(messaging, {
        vapidKey: VITE_APP_VAPID_KEY,
      });

      //We can send token to server
      console.log("Token generated : ", token);
    } else if (permission === "denied") {
      //notifications are blocked
      alert("You denied for the notification");
    }
  }

  useEffect(() => {
    requestPermission();
  }, []);
Right now we're just logging the token to the console, but this token can also be sent to a server to configure your backend using Node.js or any other backend tech you prefer.
Configuring notification listeners
Notifications can be either foreground notifications or background notifications. Every notification must have a title and body, while images are optional.
Foreground notification listener
For cases when your app is active in the foreground, we'll use the onMessage event listener from Firebase. As mentioned earlier, we'll handle notifications using react-toastify.
Add this code to your App.jsx file to create a smooth user experience:
import { toast, ToastContainer } from "react-toastify";
import Message from "./components/Message";
import "react-toastify/dist/ReactToastify.css";

function App() {

  onMessage(messaging, (payload) => {
    toast(<Message notification={payload.notification} />);
  });

 // ... Rest of the code ...
return (
    <>
      // ... Rest of the code ...
      <ToastContainer />
    </>
  );
}
To display the notifications, create a separate component called Message.jsx:
const Message = ({ notification }) => {
  return (
    <>
      <div id="notificationHeader">
        {/* image is optional */}
        {notification.image && (
          <div id="imageContainer">
            <img src={notification.image} width={100} />
          </div>
        )}
        <span>{notification.title}</span>
      </div>
      <div id="notificationBody">{notification.body}</div>
    </>
  );
};

export default Message;
You can style it however you want, or use this CSS:
#notificationHeader {
  display: flex;
  justify-content: space-around;
  align-items: center;
  font-size: 20px;
  font-weight: bold;
}

#notificationBody {
  margin-top: 10px;
  text-align: center;
}

#imageContainer {
  display: flex;
  align-items: center;
  height: 100px;
  object-fit: contain;
}
Background notification listener
For cases when your app isn't active, you need to create a service worker file called firebase-messaging-sw.js in your public folder. In this file, you'll use the messaging.onBackgroundMessage event listener.
This listener waits for incoming messages when your web app isn't in the foreground (when it's in the background or closed). When a background message comes in, it calls a callback function that logs the message and displays a notification.
We use self.registration.showNotification to display a notification in the user's browser when a background message arrives. It creates a notification with a title, body, and icon using the data from the FCM payload.
Here's the code for firebase-messaging-sw.js:
// Scripts for firebase and firebase messaging
importScripts("https://www.gstatic.com/firebasejs/8.10.0/firebase-app.js");
importScripts(
  "https://www.gstatic.com/firebasejs/8.10.0/firebase-messaging.js"
);

// Initialize the Firebase app in the service worker
// "Default" Firebase configuration (prevents errors)
const defaultConfig = {
  apiKey: true,
  projectId: true,
  messagingSenderId: true,
  appId: true,
};

firebase.initializeApp(firebaseConfig);

// Retrieve firebase messaging
const messaging = firebase.messaging();

messaging.onBackgroundMessage((payload) => {
  const notificationTitle = payload.notification.title;
  const notificationOptions = {
    body: payload.notification.body,
    icon: payload.notification.image,
  };

  self.registration.showNotification(notificationTitle, notificationOptions);
});
We're using compact versions of the scripts with importScripts which are V8 compatible.
Testing push notifications
Now let's test if our notifications service is working properly. Go to Firebase > Engage > Messaging and click on create your first campaign. Select "Firebase Notification messages" as the message type and customize your notification by adding a title, body, and optional image.
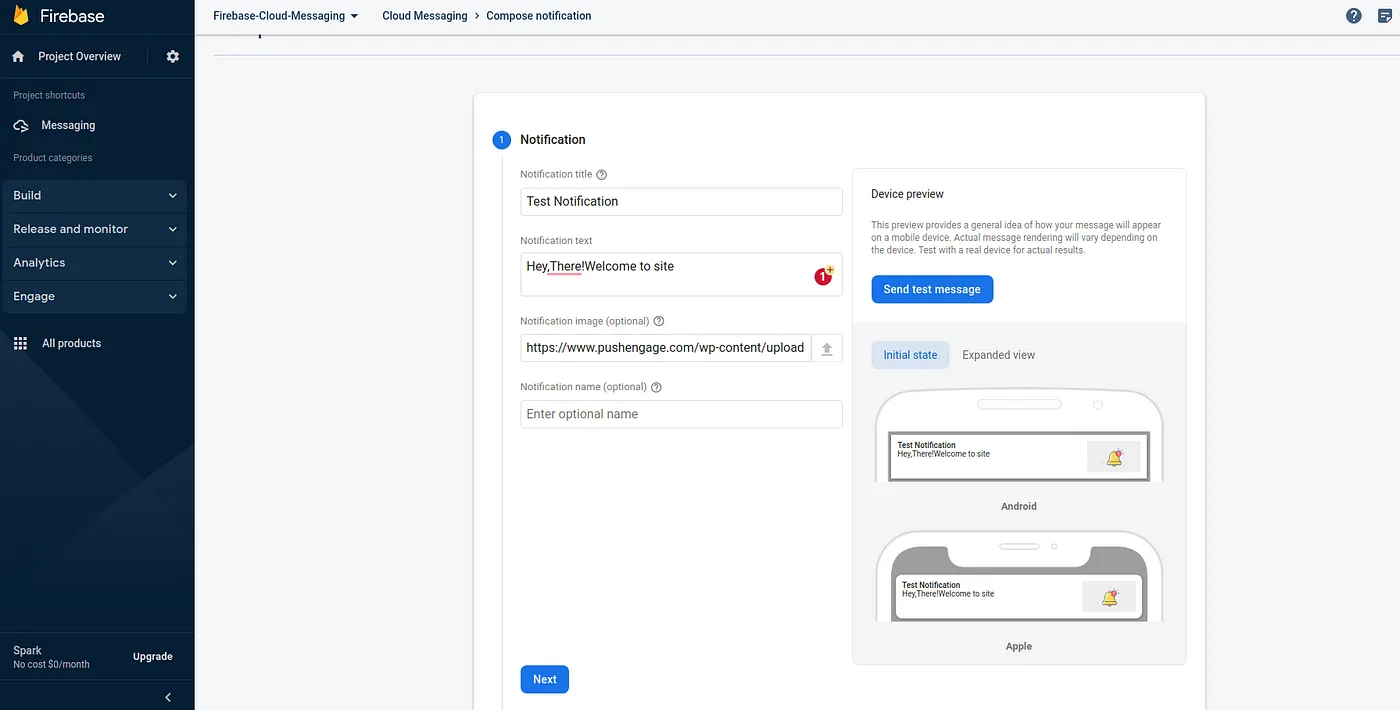
(Image Source: PushEngage)
Click on "send", and paste your registration token. Select the token and click "test". The notification message will be sent right away.
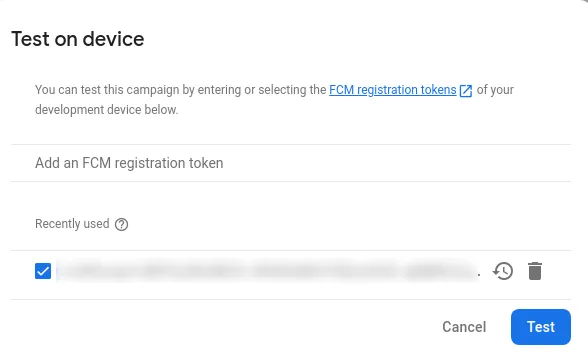
(Image Source: PushEngage)
Output
Foreground notification:
Here's how notifications look when your app is running in the foreground.

(Image Source: PushEngage)
Background notification:
And here's how they look when your app is running in the background or closed.
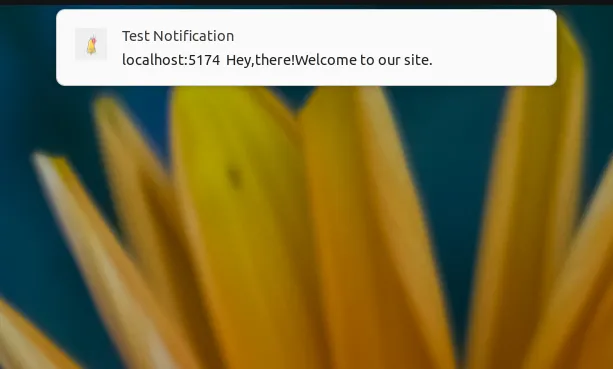
(Image Source: PushEngage)
Customization in notification campaigns
Beyond just setting a notification title, body, and image, there are many other customization options:
Audience Targeting: Target specific user segments based on criteria like languages, device types, countries/regions, and more.
Scheduling: Choose when to send notifications - immediately, at a specific time, or on a recurring schedule.
Conversion Events: Track actions you want users to take after receiving notifications, like clicking, making purchases, signing up, or any other engagement metric valuable to your app. These events help measure how effective your notification campaigns are.
Conclusion
This guide has walked you through the process of implementing push notifications in a React application step by step. Firebase Cloud Messaging is a powerful cloud-based service that lets developers send notifications across platforms. It supports real-time engagement by keeping clients informed about new data. By following the steps outlined here, you should have successfully set up your app to deliver notifications in both foreground and background scenarios, ensuring your users stay engaged with your application. FCM is a fantastic tool for developers looking to boost user engagement and deliver timely notifications in their React applications.